REVIEW: Testing Haida Photo Filters

As a landscape photographer a good set of quality filters is just as important as a solid tripod to get a high quality image in camera. I always have a circular polariser, at least one neutral density filter and a set of neutral density graduated filters in the camera bag everytime I go out on assignment or just for pleasure.
When I became a professional photographer I was an early convert to the Lee filter system but then bought into the Formatt Hitech Firecrest system two years ago. The Firecrest system offers me great quality colour neutral filters but I do find the filter holder a little fiddly and getting the polariser on and off is, quite frankly, a pain.
A couple of weeks ago I was approached by Haida, a filter manufacturer based in the city of Ningbo, 200km south of Shanghai, to see if I would be interested in reviewing their M10 and Red Diamond filter system.
I have to admit that, while I heard of the company, I haven’t come across Haida products before. So I conducted a bit of research and found several reviews that concluded that the quality of the Red Diamond filters was on a par with the best on the market. Intrigued, I emailed my contact at Haida and asked for some filters to review.

Why do I use 100mm Filters on a Fujifilm X Series?
Haida do make a smaller 75mm filter system, the M7, which is recommended for most mirrorless cameras like my Fujifilm X-T4. I prefer to use a 100mm system because I like to use ultra-wide focal lengths and my Fujinon 10-24mm f4 is my go to lens for landscapes. At 10mm (15mm in full frame terms) there is a distinct possibility of vignetting when using a 75mm system, but that issue is not a concern with a 100mm filter system such as the Haida M10.
 |
| The M10 filter holder and hard case |
Fast Delivery and Unpacking the M10
The package from Haida was delivered by DHL just three working days after it was dispatched from mainland China. Inside the package were three boxes.
One for the M10 filter holder, complete with 77mm adapter ring and a drop-in polariser filter. The second box contained a Red Diamond 100mm 0.9 soft ND grad filter and the third box held the drop in 15 stop ND filter for the M10 filter holder.
The first thing that struck me was the quality of the items. The filter holder is made of aluminium, it feels solid in my hands and comes in its own hard case. The case even comes with a clip to attach it to the outside of a camera bag or to a belt should you wish to.
At the back of the holder is the drop-in slot for the CPL and ND filters while at the front there are two slots for the 100mm filters. On the right-hand side of the filter holder is a large red lever which attaches the filter holder to the adapter ring.
Another nice touch by Haida is the M10 filter holder also comes with a blank drop in filter holder so you can stop stray light entering the lens if you are only using a grad filter on the front.
The polariser drops into the back of the filter holder and can be adjusted using the little wheel on the top of the filter holder.
 |
| Polariser is adjusted using the thumbwheel on the filter holder |
The Red Diamond ND Grad comes in a metal tin to protect your investment and is made of high quality optical glass and is placed in one of the two slots on the front of the filter holder. The box also contains extra slides so you can stack more filters if you wish to.
Finally, the glass 15 stop ND filter comes in its own protective case and like the CPL filter, also drops into the back of the filter holder.
The last thing of note was the inclusion of a plastic lens cover that means you can remove the filter holder from the lens but leave the adapter ring in place. The front element of your lens can be protected by fitting the plastic cover thoughtfully provided by Haida.
 |
| Haida provide a lens cap so you don't need to remove the adapter ring |
Testing Out in the Field
While the M10 and Red Diamond filters looked great, the proof to the optical quality could only be tested by going out and taking pictures.
With the coronavirus lockdown still in place here in Scotland, I am limited to local walks within an 8km radius around my home in Dunbar. Luckily, I live in one of the most beautiful corners of the world, so I have plenty to photograph on my doorstep. However, the one thing I can’t control is the fickle Scottish weather. After a few days of glorious sunshine, the weather decided to take a turn for the worse on the day the filters arrived.
All landscape photographers know that patience is required, so I made my plans to test the M10 filter system while keeping one eye on the weather forecast.
A weather front provided me with the first opportunity a couple of days later, so a 4am alarm call got me out of bed and heading down to Dunbar Castle to catch the sunrise for the first test.
 |
| Sunrise over Dunbar - Red Diamond 0.9 ND Grad Fujifilm X-T4 + XF10-24mm f4 - 1/80s @ f8 ISO400 |
I walked down to the castle, setting the Fujifilm X-T4 and the XF10-24mm f4 on sturdy Manfrotto 055 tripod. The M10 filter holder was attached to the front of the lens using a 77mm to 72mm step down ring on the 77mm M10 adapter ring that came with the holder. Pulling back the big red lever on the side, the filter holder was secured to the front of the lens.
After taking a shot without any filters, using the blank M10 drop in filter in the rear slot, I then took a second image using the 0.9 ND Grad. As I was shooting into the sun, I was concerned about flare on the glass filter, but I needn’t have worried as there were no flares in the final image.
I then removed the blank drop in filter and replaced it with the 15 stop ND filter. Swapping the drop-in filters is simplicity itself. Just pinch the two red levers to unlock the filter and slide it out. Then just drop in the ND filter into the slot and making sure it locks into place with a reassuring click.
 |
| Slot in filters are easy to fit and remove |
Shooting Long Exposures
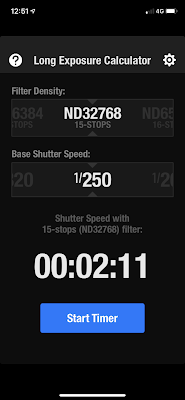
Calculating the shutter speed for a long exposure can be a bit tricky. Some ND filters can have a little bit of variance in opaqueness of the glass and times can vary. I decided to set the shutter speed for the actual time and see how light or dark it came out and adjust the time of the next shot accordingly.
To calculate the time I use an app on my iPhone called LE Calculator. You set the filter density and the shutter speed without the filter in place and it calculates the time with the ND filter. The first shot was taken at 1/250s which gave me a shutter speed of 2 minutes 11 seconds with the 15-stop filter in place.

After the camera had finished taking the image I checked it and found the exposure to be pretty much spot on. Also, there are no weird colour casts that some ND filters can give the final image. Haida promises that its filters are colour neutral and that is exactly what I got.
 |
| Sunrise at Dunbar Castle - M10 15 stop ND + 0.9 ND Grad Fujifilm X-T4 + XF10-24mm f4 - 120 secs @ f9 ISO400 |
More Testing
The morning light at Dunbar Castle was fleeting, so after 60 minutes I packed up and headed home as the rain clouds approached from the north.
The next opportunity came a couple of days later when a warm front brought a spell of fine weather. I had noticed a line of posts that had been driven into the beach at Belhaven Bay and I thought they would be a good subject for another Long Exposure test.
 |
| Belhaven Bay - M10 C15 stop ND Fujifilm X-T4 + XF16-55mm f2.8 - 120 secs @ f11 ISO160 |
Testing the Polariser
I also had the chance to test out the polariser to saturate the blue sky, the pink coastal flowers and the yellow sand of the beach. Like the 15 stop ND filter the polariser drops into the rear slot of the M10 holder and clicks into place and can be released by squeezing together the two red buttons on the top of the filter holder. In between the buttons is a small wheel that turns the filter in the holder to maximise the polarising effect.
 |
| Belhaven Bay - M10 Circular Polariser Lens Fujifilm X-T4 + XF10-24mm f4 - 1/320s @ f4 ISO160 |
Photographing the Bridge to No Where
Another early start to catch the dawn light saw me walking down to Belhaven Bay to photograph the small bridge. The Belhaven Bay footbridge across Biel Water to the sandy beach gets cut off by the rising tide and is better known as the ‘Bridge to No Where’.
Again, I had the opportunity to test the ND Grad and the ND filters for an hour after sunrise as the high tide receded to reveal more of the bridge.
 |
| Sunrise at Belhaven Bay Bridge - M10 15 stop ND + 0.9 ND Grad Fujifilm X-T4 + XF10-24mm f4 - 120 secs @ f5.6 ISO400 |
Buying Haida M10 Filters
In the UK Haida filters are only available online, with Amazon and eBay carrying stock. The 77mm filter holder and CPL kit is selling for around £165.00, the 15 Stop drop-in ND filter at just under £90 and Red Diamond 100mm ND Grads selling for just under £150.00 each. These prices compare favourably with the very best filters on the market and, in my professional opinion, represent significant ‘bang-for-buck’.
CONCLUSIONS
The Haida M10 is a high-quality filter system and the combination of drop-in and slot-in filters makes the M10 a lot more flexible for use in the field.
The optical quality of the glass used in the filters is to a very high standard and is as good, if not better, than the Firecrest filters I have been using. After this week of testing, I can confirm that the filters are definitely colour neutral and this saved me a lot of time and effort. I didn’t have to set up a custom white balance setting to compensate in camera or spend more time colour correcting in post production.
 |
| M10 filter holder fits perfectly on the Fujinon XF10-24mm ultra wide zoom lens |
The M10 system is so good that I have to be really picky to find anything negative to say. If I could have one wish, it would be to have a lock on the filter holder so it wouldn’t spin freely on the adapter mount. When shooting with ND Grads, a knock could put the filter out of alignment with the horizon.
That said my Lee and Firecrest filter holders also span freely on the adapter mount and it has become second nature to me to check the alignment of the filters before pressing the shutter release. So for me it isn’t a problem and, as I said, I am saying it just to be picky.
For me the Haida M10 and Red Diamond filter system deserve an A+ rating. As a photographer who also works commercially with video and drones, I will now have to look at the other quality products that Haida offer in those fields as well.
For more information on Haida visit www.haidaphoto.com
 |
| Belhaven Bay Bridge - No Filter used Fujifilm X-T4 + XF10-24mm f4 - 1/320s @ f5 ISO320 |
 |
| Belhaven Bay Bridge - Red Diamond 0.9 ND Soft Grad Fujifilm X-T4 + XF10-24mm f4 - 1/320s @ f5 ISO320 |
 |
| Belhaven Bay Bridge - M10 15 stop ND + 0.9 ND Grad Fujifilm X-T4 + XF10-24mm f4 - 240 secs @ f5 ISO320 |


-------------------------------------------------------------------------------------------------------------

MacLean Photographic runs Photography Workshops in East Lothian and the Borders of Scotland.
CLICK HERE for more details and availability.


Comments
Post a Comment